Prestressing Tendon
A prestressing tendon is a high-strength steel element — typically seven-wire strand, wire, or bar — used in prestressed or post-tensioned concrete to apply per...
25 min read
Reinforcement
Bridges
+4
Segmental construction is a bridge building method where the superstructure is assembled from precast or cast-in-place concrete segments, joined together and post-tensioned longitudinally. Common for long viaducts and major crossings. Covers segment types, erection methods (balanced cantilever; span-by-span; incremental launching), segment joints, and inspection of segmental bridges for joint condition and tendon corrosion.

Segmental bridge construction is a method of building concrete bridges in which the superstructure — the load-bearing deck and girder system — is divided into individual segments typically 2 to 5 meters in length along the longitudinal axis of the bridge. These segments are manufactured either as precast concrete elements in a controlled casting yard or cast in place using traveling formwork. The segments are assembled in a predetermined sequence, joined together at their interfaces using either epoxy adhesive (for precast match-cast segments) or wet concrete closure pours (for cast-in-place segments), and then longitudinally post-tensioned to create a continuous, monolithic structure capable of resisting dead load, live load, and environmental forces.
The fundamental principle behind segmental construction is the conversion of a structure built from many discrete pieces into a unified whole through the application of compressive force. Each segment is cast with one or more ducts — corrugated steel or HDPE tubes that run through the segment from one joint face to the other. After all segments in a span or cantilever arm are assembled and aligned, high-strength post-tensioning tendons — typically 7-wire strands conforming to ASTM A416 Grade 270 (1860 MPa) — are threaded through these ducts. Hydraulic jacks tension the tendons to approximately 75% to 80% of their ultimate tensile strength, and the tendons are anchored against the concrete using mechanical anchorage assemblies at the segment ends. The tendons attempt to shorten elastically, compressing the concrete and clamping the segment joints together. After stressing, the ducts are filled with cementitious grout per PTI M55.1-12 specifications to protect the tendons from corrosion and to create bond between the tendon and the surrounding structure.

Segmental bridge construction originated in Europe in the 1950s and developed rapidly through the 1960s and 1970s. The first major precast segmental bridges were the Choisy-le-Roi Bridge over the Seine (1962) and the Oleron Bridge in France (1966), both using the balanced cantilever method. In the United States, the first precast segmental bridge was the John E. Kennedy Memorial Causeway in Texas (1973), followed by the Long Key and Seven Mile Bridges in the Florida Keys (1980–1982). Today, segmental bridges have been built on every continent, with span lengths ranging from 25 meters to over 760 meters for cast-in-place cantilever construction and 120 meters for precast segmental cantilever construction.
The ASBI (American Segmental Bridge Institute) identifies the following defining characteristics of segmental construction: repetitive construction procedures that benefit from industrialization and learning curve effects, minimum impact to traffic and the environment during construction because falsework is eliminated, economical construction for long bridges through standardization, and durable structures with low life-cycle maintenance costs. Segmental bridges also offer geometric versatility — they can be built on tight horizontal curvature (such as curved highway access ramps with radii as tight as 50 meters), on steep longitudinal gradients (up to 4–5% without major difficulty), and over varied terrain where traditional falsework would be impractical or environmentally damaging.
In precast segmental construction, individual segments are manufactured in a plant-type casting yard while foundation and substructure work proceeds concurrently at the bridge site. This parallel production is a major schedule advantage. Segments are produced using two methods:
Short-line match casting is the most common method for precast segmental bridges. A single casting cell is used, consisting of a fixed bulkhead at one end (the casting machine), a movable bulkhead at the other end (the stopping bulkhead), and side forms. The key feature is that each new segment is cast directly against the previous segment (or against a match-cast dummy for the first segment). The joint face of the previously cast segment is coated with a bond-breaking compound so the new segment can be separated after curing. The short-line method requires precise control of the relative position and orientation of each segment during casting using a casting geometry control system that calculates the required position corrections for each segment based on the theoretical alignment. This method is space-efficient — a single casting cell can produce one segment per day — and provides the highest precision, with joint face fit tolerances of ±1 mm.
Long-line casting uses a full-span bed with fixed formwork for each segment position along the span. All segments for a span are cast simultaneously. Each segment is cast against a rigid bulkhead rather than against the adjacent segment. The long-line method is simpler geometrically but requires more space and formwork. It is used when the bridge geometry is repetitive (constant span length, constant curvature) and when a high production rate is needed.
| Property | Short-Line Method | Long-Line Method |
|---|---|---|
| Space requirement | Small (single cell) | Large (full-span length bed) |
| Formwork cost | Low (single set) | High (multiple sets per span) |
| Geometric precision | Very high (±1 mm joint fit) | Moderate (independent bulkheads) |
| Production rate | ~1 segment/day | Multiple segments/cycle |
| Adaptability to curvature | Excellent (controlled by geometry control system) | Limited (requires bed adjustment) |
| Typical segment weight range | 30–150 tonnes | 30–150 tonnes |
| Typical segment length | 2.0–5.0 m | 2.0–4.0 m |
Precast segments offer several inherent advantages. Factory quality control ensures consistent concrete strength, dimensional accuracy, and proper placement of reinforcement and post-tensioning ducts. The casting environment protects against weather delays and temperature extremes. Segments can be cured using accelerated methods (steam or heat curing) to achieve 70% of specified compressive strength (typically fci’ ≥ 28 MPa or 4000 psi at transfer) within 12–24 hours. Standardization means that hundreds of identical segments can be produced from the same casting cell, with only minor geometry adjustments for curvature and grade. Segment storage allows a stockpile to be built up before erection begins, decoupling production from erection and allowing the construction schedule to absorb delays at either stage.
The primary limitations of precast construction are the capital cost of the precasting facility (casting cells, gantry cranes, storage yard, handling equipment), transportation constraints (segment size and weight must be compatible with road, rail, or barge transport from yard to site, with maximum widths typically limited to 4.3 m for road transport unless special permits are obtained), and erection equipment costs (self-launching gantries, lifting frames, or large ground cranes are required). The ASBI notes that deck surfaces around 20,000 m² may warrant feasibility analyses for precast segmental versus alternative methods.
Cast-in-place (CIP) segmental construction uses traveling form travelers or movable scaffolding systems (MSS) that support the formwork at the end of each cantilever arm or at the span position. Each new segment is cast directly against the previously completed segment, with the concrete placed in situ. After the concrete reaches sufficient strength (typically 70% of fci’ after 3–5 days), the form traveler is moved forward to the next segment position, and the cycle repeats. The construction cycle for a typical CIP segment is 3 to 7 days, depending on span length, segment size, concrete strength development, and weather conditions.
CIP segmental construction is particularly suitable for span lengths exceeding 120 meters where precast segments would be too heavy to transport or erect. The longest CIP segmental bridges in the United States include the Houston Ship Channel Bridge (230 m main span) and the John James Audubon Bridge (230 m main span in Louisiana). CIP construction eliminates the need for segment transportation, which is a major advantage for remote sites with limited road access, and for sites where segment weight exceeds 200 tonnes.
| Comparison Factor | Precast Segmental | Cast-in-Place Segmental |
|---|---|---|
| Span range | 30–120 m (up to 160 m with lifting frames) | 40–230+ m |
| Cycle time per segment | 1 day (casting yard) + erection time | 3–7 days (on site) |
| Concrete quality | Excellent (controlled plant conditions) | Good (site-controlled, weather-dependent) |
| Geometry control | Match-cast precision (±1 mm) | Cast-in-place tolerance (±3–5 mm) |
| Transportation cost | Significant (yard to site) | None |
| Erection equipment | Self-launching gantry, lifting frame, cranes | Form travelers, MSS |
| Minimum economic length | ~20,000 m² deck surface for amortization | Shorter bridges can be economical |
| Foundation loading during construction | Segments placed by crane/gantry | Form travelers impose lower temporary loads |
The choice between precast and CIP segmental construction depends on project-specific factors: bridge length, span distribution, site accessibility, segment size and weight constraints, construction schedule, labor costs, local precasting facility availability, and environmental constraints. Many large infrastructure programs use both methods — precast for long approach viaducts with repetitive spans and CIP for the main navigation spans.
Match-casting is the defining fabrication technique for precast segmental bridges. Each segment, after casting, becomes the match-cast form for its adjacent segment. This ensures that the joint faces are geometrically complementary — when the two segments are brought together during erection, they fit perfectly despite potential cumulative geometric variations from segment to segment. The match-casting process compensates for the small angular errors that inevitably occur during casting by distributing them over the entire bridge length rather than allowing them to accumulate at a single joint.
In the short-line method, the match-casting process begins with a pier segment (also called the segment “zero” ), which is cast first. This segment is usually longer than typical segments (3.5–5.0 m versus 2.5–3.5 m) and contains the pier diaphragm with access openings. All subsequent segments are cast against the preceding segment using the geometry control system. Before each casting, the previously cast segment is positioned in the casting cell relative to the fixed bulkhead. The position is adjusted in six degrees of freedom — three translational (x, y, z) and three rotational (pitch, yaw, roll) — based on calculations from the bridge designer’s alignment data. The adjustments account for the planned bridge geometry (horizontal curvature, vertical grade, superelevation) and for corrections needed to maintain the alignment over multiple segments. Each segment cast against the preceding one creates a match-cast key — a set of male and female shear keys on the joint face that interlock during erection to provide shear transfer across the joint without relying solely on post-tensioning compression.
The match-casting process is supported by detailed casting geometry tables generated by the bridge designer or the segmental construction engineer. These tables specify, for each segment in the bridge, the exact position and orientation of the match-cast segment relative to the fixed bulkhead. A typical 1,000-meter bridge with 3.0-meter segments requires 333 individual geometry entries, each accounting for the cumulative effect of curvature, grade, and the desired geometric corrections. Survey monuments are installed at each segment during casting, and the final as-cast geometry is documented for use during erection.
Epoxy joints — also called Type A joints in the AASHTO/ASBI classification — are the standard joint type for precast segmental bridges. The epoxy serves multiple functions:
Gap filling and stress distribution: When the segment joint faces are brought together, a thin layer of epoxy (typically 0.5 to 1.5 mm thick after compression) fills any surface irregularities between the match-cast faces. Even with match-cast precision, microscopic surface variations of 0.1–0.3 mm exist across the joint face. The epoxy fills these gaps, ensuring uniform bearing across the entire cross-section when the post-tensioning force is applied. Without the epoxy, high points on the joint face would carry concentrated stresses, potentially causing local crushing of the concrete.
Shear transfer: Before the epoxy cures, it provides initial shear resistance that prevents relative movement between segments during handling and temporary post-tensioning. After curing, the epoxy develops a shear strength typically exceeding 10 MPa, supplementing the shear capacity from match-cast keys and the frictional resistance from post-tensioning compression.
Watertight seal: The cured epoxy forms a continuous, watertight barrier across the entire cross-section of the bridge — including deck, webs, and soffit. This prevents water and chloride-laden moisture from penetrating the joint and reaching the post-tensioning tendons, anchorages, and ducts. In aggressive environments (marine, deicing salts), this watertightness is critical for long-term durability. The FHWA Post-Tensioned Box Girder Design Manual and PTI/ASBI M50.3-12 emphasize the importance of complete, void-free epoxy application for joint sealing.
Corrosion prevention: By sealing the joint against moisture ingress, the epoxy prevents the conditions that lead to tendon corrosion — the most common cause of deterioration in segmental bridges.
The epoxy used for segmental bridge joints is a two-part epoxy system (resin and hardener) specifically formulated for bridge construction applications. The epoxy must meet the following performance requirements per ASBI guidelines: a pot life (workable time) of 30–60 minutes at the ambient temperature, a minimum compressive strength of 30 MPa after 24 hours per ASTM C109 (modified for epoxy), a minimum tensile bond strength of 2 MPa to moist concrete, low creep under sustained compression, and resistance to moisture and UV degradation.
Application procedure for epoxy joints: The joint faces of both segments are thoroughly cleaned by sandblasting or high-pressure water jetting to remove laitance, dirt, and any bond-breaking compound from the casting process. The surface must be saturated surface dry (SSD) — damp but without standing water. The epoxy resin and hardener are mixed using a power mixer, then applied to one face of the joint using rollers, brushes, or spray equipment. The application thickness is 1.5–2.0 mm. The segments are brought together using the erection equipment (gantry, lifting frame, or crane), and temporary post-tensioning bars (typically 32 mm or 36 mm diameter high-strength bars) are stressed to apply a temporary compression of approximately 0.3–0.5 MPa across the joint. This compression squeezes out excess epoxy, ensuring a thin, continuous bond line. The squeezing process is carefully monitored — the epoxy “squeeze-out” around the entire perimeter of the joint face confirms that full contact has been achieved. After the epoxy cures (typically 6–12 hours, depending on temperature and epoxy formulation), the longitudinal post-tensioning tendons are stressed. The temporary bars are then removed.
Wet joints (cast-in-place closures) are used instead of epoxy joints at specific locations such as the midspan closure between two cantilever arms (the closure pour) and at pier segments where continuity with the substructure is required. Wet joints use high-performance, low-shrinkage concrete with a maximum aggregate size of 10 mm to ensure complete filling of the narrow gap (typically 0.5–1.0 m). The fresh concrete is placed against the hardened joint faces of the precast segments, which are roughened and wetted for bond. Wet joints are inherently weaker and more permeable than match-cast epoxy joints and require careful quality control. Per AASHTO LRFD, the frictional resistance of wet joints must be explicitly verified in design.
Dry joints — also called Type B joints — are used where the joint faces are not epoxied and rely entirely on match-cast keys and permanent post-tensioning compression for shear transfer. Type B joints are less common than Type A in modern segmental bridges but are found in some older structures and in certain applications where speed of erection is paramount. Dry joints must be designed with deeper shear keys (typically 40–60 mm deep versus 20–30 mm for epoxy joints) because the joint faces can slide relative to each other under shear if the post-tensioning is insufficient. The AASHTO system factors table (MBE Table 6A.5.11.6-1) specifically distinguishes between Type A and Type B joints, with different system reduction factors to account for the reduced redundancy of dry joints.
Segmental bridge erection methods are classified into four primary categories, each suited to specific span ranges, site conditions, and project requirements.
The balanced cantilever method is the most widely used erection technique for precast and cast-in-place segmental bridges with medium to long spans. The principle is straightforward: starting from a pier, segments are erected symmetrically in both directions — forming a hammerhead — with each new segment on one side being counterbalanced by a segment on the opposite side. The cantilever arms are extended equally in both directions until they meet adjacent cantilevers at midspan, where a closure pour connects them.
For precast balanced cantilever, segments are typically erected using: a self-launching gantry that spans between completed piers, supporting the segment at the end of the cantilever; lifting frames that hoist segments from ground level or barges directly to the cantilever tip; or ground cranes that lift segments when the deck height is moderate and ground access is available. Each segment is epoxied and temporarily post-tensioned to the preceding segment using cantilever tendons located in the top slab — typically 4 to 12 tendons per cantilever arm. The cantilever tendons are stressed progressively as each segment is added, providing the force required to carry the dead load of the cantilever during construction. The span range for precast balanced cantilever is 50–120 meters for constant-depth spans and up to 160 meters for varying-depth spans with special lifting equipment.
For cast-in-place balanced cantilever, a form traveler is used at the end of each cantilever. The traveler supports the formwork, fresh concrete, and construction loads for each new segment. The concrete is placed, cured (typically 3–5 days), and the cantilever post-tensioning tendons are stressed — usually a combination of top slab tendons and web tendons. The form traveler then advances to the next segment position. CIP balanced cantilever has been used for span lengths up to 760 meters in the US (Houston Ship Channel Bridge) and over 300 meters internationally. The cycle time per segment is 3–7 days.
| Parameter | Precast Balanced Cantilever | CIP Balanced Cantilever |
|---|---|---|
| Span range | 50–160 m | 40–760 m |
| Segment length | 2.5–5.0 m | 3.0–6.0 m |
| Cycle time | 1–3 segments erected per day | 3–7 days per segment |
| Equipment | Gantry, lifting frame, or crane | Form traveler |
| Tendon system | Cantilever tendons in top slab | Cantilever tendons + continuity tendons |
| Maximum pier height | Limited by lifting equipment | Limited by traveler and concrete pumping |
Critical design considerations for balanced cantilever construction include the stability of the cantilever under construction loads (wind, segment delivery loads, equipment loads), the control of deflections at the cantilever tip (which accumulate and must be compensated for through camber adjustments), the stress distribution at the pier segment (where the highest negative bending moments occur during construction), and the thermal gradient effects on the exposed cantilever arms.
The span-by-span method is the most common erection technique for long viaducts and elevated roadways with repetitive spans. An entire span is assembled, epoxy-joined, post-tensioned, and made self-supporting before the next span is erected. The method is particularly efficient for span lengths of 25–45 meters and bridge lengths exceeding 300 meters.
A self-launching gantry is the primary erection equipment for span-by-span construction. The gantry consists of a main truss or box girder supported on legs that bear on the completed bridge deck and the leading pier. Segments are transported along the completed deck, lowered into position within the gantry, and placed in sequence from one end of the span to the other (typically from one pier toward the opposite pier). After all segments are placed and epoxy-joined, longitudinal post-tensioning tendons — often external tendons located inside the box girder void — are stressed. The gantry then launches to the next span by extending its leading legs to the next pier and sliding forward on rollers.
Gantry types include overhead gantries that support the segments from above (the segment hangs from the gantry via lifting beams) and underslung gantries that support the segment from below (the gantry passes through or under the box girder). Overhead gantries are more common for straight bridges, while underslung gantries offer advantages for curved alignments where the segments must be placed on a curved trajectory.
The typical span cycle for span-by-span construction is:
| Activity | Duration |
|---|---|
| Gantry launch to next span | 4–8 hours |
| Segment positioning (10–20 segments) | 1–2 days |
| Epoxy application and temporary joining | 1 shift |
| Longitudinal PT stressing | 1 shift |
| Grouting (if internal tendons) | 1 shift + 24 hour cure |
| Total span cycle | 3–7 days |
For simply supported spans, the cycle can be as short as 3 days (2.5 spans per week). For continuous spans requiring continuity tendons at the pier diaphragms, weekly cycles are typical.
Span-by-span construction is most economical for ten or more consecutive spans with the same cross-section and span length. The minimum economic bridge length is typically 300–500 meters, depending on mobilization costs for the gantry and casting yard.
The incremental launching method (also called ILM or push launching) involves assembling the superstructure in sections behind one abutment and then pushing or pulling the completed sections forward incrementally as new sections are added at the rear. The method has been used extensively for cast-in-place concrete bridges but can also be applied to precast segmental bridges in specific cases.
For cast-in-place incremental launching, a casting yard is established behind the abutment, typically 15–25 meters long. A formwork system casts each deck segment (usually equal to one standard segment length of 15–25 meters, corresponding to a typical casting cycle of one week). After the concrete reaches sufficient strength (typically 70% of fci’), longitudinal launching tendons are stressed — straight tendons located through the entire cross-section — and the segment is launched forward by hydraulic jacks. The jacks push against a launching nose attached to the front of the superstructure, with the nose spanning from the leading edge of the deck to the next pier. The nose reduces the cantilever moment during launching.
For precast segmental incremental launching, individual precast segments are assembled into full-span sections behind the abutment, post-tensioned temporarily, and launched forward. The combination of precast segmental technology with incremental launching is relatively uncommon because the cost of the casting yard and launching equipment can exceed the cost of a self-launching gantry for span-by-span erection. However, the method has been used successfully for bridges where: the terrain below the bridge is inaccessible (deep water, environmentally sensitive areas), the bridge has a constant cross-section and alignment (simplifying launching), and low headroom prevents gantry erection.
Incremental launching is best suited for straight bridges or bridges with constant horizontal curvature (radius ≥ 500 m) and constant grade (≤ 3%). The method requires the entire superstructure to be stressed in both directions — longitudinal launching tendons to resist the launching forces, and full transverse post-tensioning to control transverse bending during the launch. Teflon-coated bearing pads at the pier tops support the superstructure during launching, with friction coefficients of approximately 0.02–0.05.
Full-span erection (also called span erection) uses a beam launcher or crane to place entire precast spans — typically precast I-girders or U-girders — in a single lift. While not a segmental method in the strict sense, it is sometimes confused with segmental span-by-span construction. Full-span erection is used for span lengths up to 50 meters with girder weights up to 200 tonnes.
Progressive placement (also called end-on erection or progressive cantilever) starts at one abutment and erects segments sequentially toward the opposite abutment. Each new segment is placed at the advancing end of the growing superstructure. The method is useful for environmentally sensitive areas where ground access is restricted to one or both ends, and for bridges over deep gorges where intermediate piers cannot be built. Progressive placement typically requires temporary piers at midspan locations (for span lengths of 30–90 meters) or a cable-stayed temporary support system for longer spans. The erection rate is the slowest among the four methods because there is only one work front.
Longitudinal post-tensioning is the structural “backbone” of a segmental bridge — the system of high-strength steel tendons that compresses the assembled segments into a continuous structure.
Cantilever tendons are stressed progressively during erection in balanced cantilever construction. These tendons are typically located in the top slab of the box girder, positioned as close to the top fiber as permitted by cover requirements (typically 40–60 mm minimum cover per AASHTO LRFD). They are stressed in stages — a portion of the total force is applied after each segment is added, providing the compression needed to resist the cantilever moment. The number of cantilever tendons per cantilever arm ranges from 4 to 12 for typical spans, with each tendon consisting of 12 to 22 strands of 0.6-inch (15.24 mm) diameter strand. The total tendon force per cantilever arm can reach 4,000 to 12,000 kN.
Continuity tendons are stressed after the closure pour connects two adjacent cantilevers. These tendons are placed in the bottom slab (for positive moment continuity) and sometimes in the webs (for shear continuity). Continuity tendons provide the prestress force required to resist live load moments, temperature gradient effects, and superimposed dead loads. The continuity tendons are typically longer than cantilever tendons, spanning across the closure pour and extending into the adjacent span segments.
| Tendon Type | Location | Stressed When | Purpose |
|---|---|---|---|
| Cantilever tendons | Top slab | After each segment (staged) | Resist dead load during construction |
| Continuity tendons | Bottom slab | After midspan closure | Resist live load positive moments |
| Span tendons | Top slab or webs | After full span assembly | Resist dead and live load (span-by-span) |
| Stay cables | Pylon to deck | During construction | Support deck in cable-stayed bridges |
External tendons are a key innovation in modern segmental bridges, particularly for span-by-span construction. External tendons are located inside the box girder void — they are not embedded in the concrete but are placed in HDPE pipes or are left exposed within the box. They are deviated at intermediate points using deviator blocks (typically cast into the segment at 1/3 and 2/3 span points) to create the required draped profile. External tendons offer several advantages: they can be visually inspected directly by walking inside the box girder; they can be detensioned, removed, and replaced if corrosion is detected; they have lower friction losses because there is no concrete contact along their length; and they simplify segment fabrication because no internal ducts are needed in the segment webs. The primary limitation is that external tendons provide less ultimate flexural strength than bonded internal tendons because the strain is not compatible with the adjacent concrete at ultimate.
Internal bonded tendons remain the standard for balanced cantilever construction and for bridges in aggressive environments where maximum corrosion protection is needed. Internal tendons are embedded in the concrete of the webs and flanges, with each tendon in a corrugated steel or HDPE duct that is grouted after stressing. The grout provides full bond and corrosion protection.
The post-tensioning procedure for a segmental bridge follows a strict sequence. The stressing sequence is designed by the bridge engineer to: (1) control stresses during construction within allowable limits per AASHTO LRFD (tensile stress ≤ 0.19√f’c for fully prestressed members, compressive stress ≤ 0.60 f’c at transfer), (2) ensure that the segment joints are adequately compressed (minimum 0.5–1.0 MPa compression across joints under all load combinations), (3) control deflections and maintain the planned bridge geometry, and (4) avoid overstressing any segment during construction.
The actual stressing operation uses a hydraulic jack connected to a hydraulic pump with a calibrated pressure gauge and a load cell. The jack is positioned against the concrete at the anchorage trumpet. The strands are individually inserted into the wedges of the multi-strand anchor. The jack applies force to the strand bundle, elongating the tendon by the calculated amount. The target elongation and jacking force are specified on the shop drawings — for example, a 19-strand 0.6-inch tendon stressed to 0.75 fpu (75% of ultimate strength) would have a jacking force of approximately 3,700 kN and an elongation of 200–400 mm depending on tendon length.
The measured elongation must match the calculated elongation within ±5% per PTI/ASBI M50.3-12. If the difference exceeds 5%, the stressing is stopped and the cause investigated — typically due to friction higher than assumed (wobble coefficient k = 0.0002/ft for steel ducts and μ = 0.15–0.20 per AASHTO), strand binding in the duct, or a blocked duct from concrete intrusion during casting. If the elongation is within tolerance, the wedges are seated, and the jack is released. The force is transferred from the jack to the anchor.
After all tendons for a construction stage are stressed, the ducts must be grouted within 20 days (or sooner in aggressive environments per PTI M55.1-12). Grouting is performed using a colloidal mixer that produces a homogeneous grout with a water-to-cement ratio ≤ 0.44, zero bleed water per ASTM C940, and an efflux time (flow cone test per ASTM C939) of 11–30 seconds. For long tendons (over 50 m) or vertical profiles, vacuum grouting is specified — a vacuum pump draws negative pressure of −0.08 MPa at the high point while grout is pumped from the low point.
Joint durability is one of the most critical long-term performance aspects of segmental bridges. The joints are the interfaces between individual segments and represent potential pathways for moisture, chlorides, and other aggressive agents to reach the post-tensioning tendons.
Epoxy joint deterioration can occur through multiple mechanisms. Moisture ingress through incomplete epoxy coverage or voids in the bond line allows water to reach the joint interface. Over time, the water can carry deicing salts (chlorides) through the joint and into the tendon ducts. UV degradation of exposed epoxy at the external surfaces of the joint (the soffit and the side faces of the web) can cause embrittlement and microcracking. Thermal cycling — daily and seasonal temperature variations — induces relative movement across joints due to differential thermal expansion, potentially fatiguing the epoxy bond line. Shear overload from vehicles (particularly for bridges with high truck volumes) can cause distress at the joint shear keys.
Wet joint deterioration at closure pours is more common than epoxy joint problems. The cast-in-place concrete at closures often has higher permeability than the precast segment concrete because of the lower water-to-cement ratio and the difficulty of proper consolidation in the narrow gap. Shrinkage cracking at the interface between precast and cast-in-place concrete creates a pathway for moisture ingress.
Dry joint deterioration (Type B joints, without epoxy) relies entirely on the match-cast shear keys and the compressive stress from post-tensioning. If the post-tensioning force is reduced due to creep, shrinkage, or tendon relaxation over time (long-term losses of 15–25% of initial prestress), the joint compression may drop below the threshold required to prevent relative movement under live load. This can lead to progressive wear of the shear keys and visible joint opening.
The AASHTO Manual for Bridge Evaluation (MBE) Section 4.3.6.5 provides specific guidance for inspection of prestressed segmental bridges. Inspectors are directed to examine:
Localized sags or humps at joints — A noticeable vertical offset between adjacent segments indicates that the joint has experienced relative movement, either from shear key failure, inadequate post-tensioning, or foundation settlement. The acceptable tolerance is typically ±2 mm relative displacement between adjacent segments.
Corrosion of prestressing tendons due to moisture in ducts — The most severe durability risk. Inspectors look for rust staining at joints (brownish discoloration on the concrete surface near the joint, running vertically from the deck or horizontally along the web), efflorescence (white powdery deposits indicating water migration through the joint), and exposed tendon ends at anchorages showing signs of corrosion.
Keys in girder stems — The shear keys at the joint faces must be examined for cracking, spalling, or crushing. Damaged keys indicate inadequate shear transfer and potential overstress of the post-tensioning system.
Cracking — Joints are inspected for surface cracks extending from the joint line into the adjacent concrete. Cracks wider than 0.3 mm at the surface typically indicate tensile stress in the joint region, possibly from thermal effects, insufficient prestress, or structural overload.
Deck and soffit inspection — The deck surface at joints is examined for longitudinal cracking above the web lines (indicating transverse flexure or joint movement), and the soffit is examined for signs of joint separation or concrete spalling.
For detailed joint inspection, inspectors use access equipment including under-bridge inspection units (snooper trucks), manlifts, scaffolding, or rope access to reach all joint faces on both external surfaces and inside the box girder. Inside the box, joint faces are directly accessible and can be examined for internal efflorescence (indicating moisture that has traveled along the duct), grout weepage (cement paste that has exuded from the duct during grouting), and strand exposure at anchorages.
Non-destructive testing methods for joints include Impact-Echo (IE) to detect delaminations or voids within the joint zone, Ground Penetrating Radar (GPR) to locate tendon ducts and detect moisture near joints, and ultrasonic tomography for internal imaging of joint conditions.
The FHWA and AASHTO recommend the following minimum inspection intervals for segmental bridge joints: Routine inspection — every 24 months (standard biennial NBIS cycle); In-depth inspection — every 5 years, including internal inspection inside box girders and a detailed review of all accessible joints; Special inspection — after extreme events (seismic, flood, scour, vessel impact, overload) or when routine inspection identifies deficiencies at CS-3 or CS-4.
Tendon corrosion is the single most critical durability issue in post-tensioned segmental bridges. The FHWA has documented multiple cases of tendon failures in segmental bridges since the 1990s, prompting significant research and updated specifications for corrosion protection.
Chloride-induced corrosion is the most common cause of tendon deterioration in segmental bridges exposed to deicing salts or marine environments. The chloride ions (Cl⁻) penetrate the concrete cover through cracks, porous concrete, and leaking joints, eventually reaching the post-tensioning ducts. At the tendon surface, chlorides locally break down the passive iron oxide layer that forms naturally on steel in the alkaline concrete environment (pH 12.5–13.0). Once the passive layer is compromised, pitting corrosion initiates at the exposed site. Under the sustained high tensile stress in the prestressing strand, pits grow rapidly, reducing the cross-sectional area and increasing the local stress. The critical chloride threshold for prestressing steel is approximately 0.2% by mass of cementitious material — significantly lower than for conventional reinforcing steel.
Stress Corrosion Cracking (SCC) results from the combined action of sustained tensile stress and a corrosive environment, causing brittle fracture at stresses below the yield strength of the steel. Prestressing strand is particularly susceptible to SCC because it operates at 60–75% of its ultimate tensile strength continuously.
Hydrogen embrittlement affects high-strength steels (tensile strength exceeding 1,200 MPa, which includes Grade 270 strand at 1,860 MPa). Atomic hydrogen enters the steel lattice from corrosion reactions, reducing ductility and causing sudden brittle fracture. Sources of hydrogen include overprotected cathodic protection systems, galvanic coupling with dissimilar metals in the anchorage zone, and corrosion reactions in acidic conditions.
Grout-related corrosion has been documented in bridges with defective grout. The FHWA study “Corrosion-Induced Major Tendon Failures in Post-Tensioned Bridges” (2022) identified three distinct grout deficiency types:
| Deficiency Type | Description | Mechanism |
|---|---|---|
| Grout voids | Incomplete filling of the duct with grout, leaving air-filled or water-filled spaces | Water accumulates in voids, providing electrolyte for corrosion with free oxygen access |
| Grout segregation | Separation of grout components — dense cement particles settle, leaving a soft, porous, high-water-content layer at the top | The segregated layer has lower pH, higher porosity, and provides a preferential corrosion path |
| Chloride-contaminated grout | Chloride content exceeding 0.08% by mass of cementitious material | Direct initiation of pitting corrosion without requiring external chloride ingress |
A survey by the National Academies (NCHRP Project 12-119) found that in precast segmental bridges built before 2000, approximately 15% of tendon ducts showed evidence of grout voids, with the voids concentrated at high points of draped tendon profiles and at anchorages.
Tendon inspection in segmental bridges requires a progressive protocol. Visual inspection inside the box girder examines all accessible tendon anchorages at each segment joint. Inspectors look for: rust staining at the anchorage trumpet or wedge plate, exposed strand with visible corrosion, cracking of the concrete around the anchorage, and moisture or water accumulation in anchorage pockets. Ground Penetrating Radar (GPR) scans the deck and web surfaces to locate tendon ducts and detect moisture anomalies. GPR is rapid but cannot reliably distinguish solid grout from soft grout. Impact-Echo (IE) testing at 1-foot intervals along the duct path detects voids by analyzing frequency shifts in stress wave reflections. Ultrasonic tomography provides 3D imaging of duct conditions. Borescope inspection through drilled access holes (typically 10 mm diameter) provides direct visual confirmation of grout condition and strand corrosion.
| NDT Method | Capability | Limitation |
|---|---|---|
| Visual inspection | Surface rust staining, cracking, spalling | Cannot detect internal conditions |
| GPR (900–1600 MHz) | Duct location, moisture detection | Cannot distinguish solid vs soft grout |
| Impact-Echo | Void detection in ducts | Requires skilled interpretation |
| Ultrasonic tomography | 3D imaging of grout condition | Slow survey speed |
| Borescope | Direct visual confirmation | Limited to accessible duct ends |
The FHWA-endorsed validation protocol recommends: GPR scanning for duct location, IE at suspect locations (15–20% of total length), cross-referencing of findings, and invasive confirmation at ≥ 5% of test locations for calibration.
Inspecting segmental bridges presents unique challenges not encountered in conventional monolithic concrete bridges.
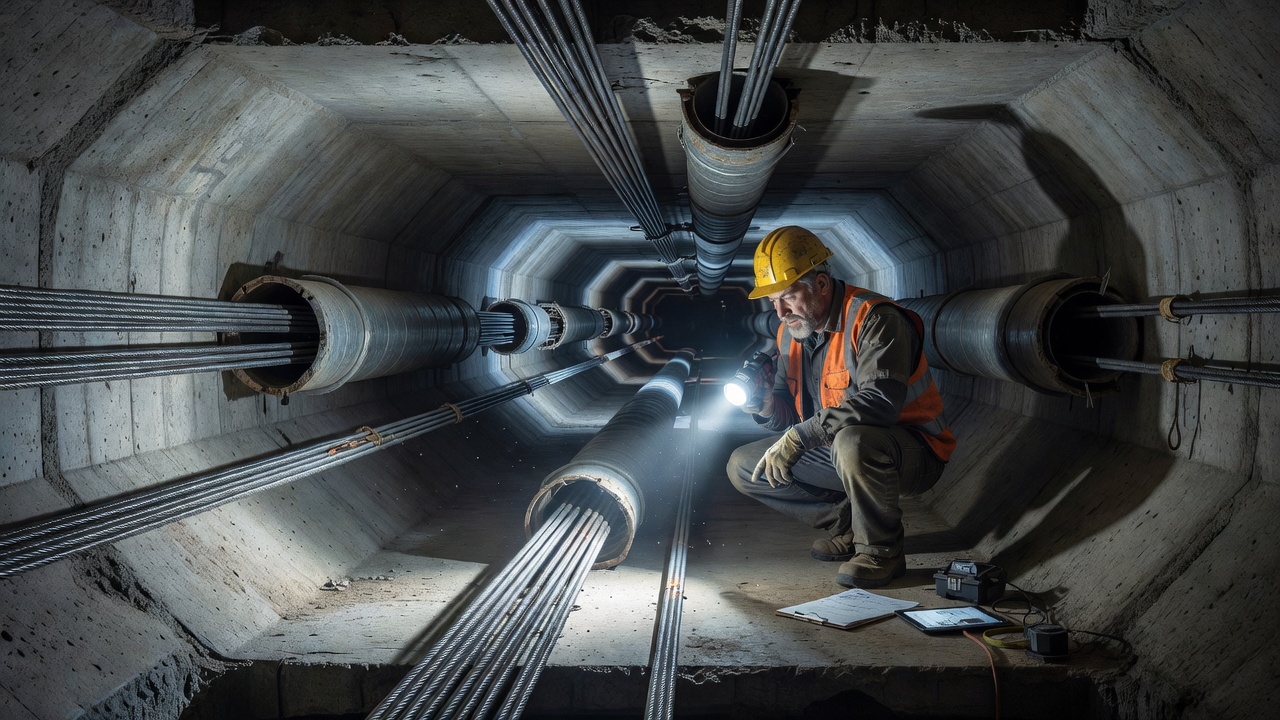
The primary inspection challenge is access to the interior of box girders and to the external soffit and web faces. Access inside the box girder is through access openings at the pier diaphragms, typically 0.6 × 1.2 m in size. Once inside, the inspector can walk the full length of the bridge inside the void. However, multiple-span continuous bridges with a typical box width of 3–6 m present inspection challenges due to: the dark, confined space requiring specialized lighting and safety equipment, the dust and debris accumulation on the bottom slab that may hide signs of efflorescence or corrosion, the limited headroom in shallow superstructures (as little as 1.2–1.8 m internal height in constant-depth segments), and the presence of the ventilation system and possible bird or animal nests. Inspectors must follow confined space entry protocols per OSHA 29 CFR 1910.146.
External access to the soffit and web faces requires under-bridge inspection vehicles (snooper trucks) for bridges up to 15 m in height, manlifts or rope access for taller piers, and barges for bridges over water. Many segmental bridges have high piers exceeding 50 m, making conventional maintenance access equipment insufficient and requiring specialist abseiling or climbing teams.
Internal bonded tendons are embedded in the concrete and cannot be accessed for direct inspection without destructive methods. Inspectors must rely on NDT techniques that detect internal conditions through the concrete cover. Even with advanced NDT, the accuracy of void detection in multi-strand tendons in thick webs (600–800 mm) remains an area of active research. External tendons located in the box void are fully accessible and can be visually inspected along their entire length — a significant advantage for long-term condition assessment.
Segment joints must be inspected across the full cross-section — deck, webs, and soffit — on both external and internal faces. A complete joint inspection requires both internal box access and external under-bridge access. The total number of joints in a segmental bridge can be substantial — a 1,000 m bridge with 3 m segments has 333 joints, each requiring detailed examination.
Segmental bridges are sensitive to thermal gradients — the difference in temperature between the top deck (solar-heated) and the bottom soffit (shaded). A positive thermal gradient (top warmer than bottom) causes the deck to expand more than the soffit, inducing compressive stresses in the top slab and tensile stresses in the bottom slab. Per AASHTO LRFD Article 3.12.3, the standard thermal gradient for concrete box girders includes a 25°C (45°F) differential for solar radiation zones. This gradient induces moments that must be considered in design and affects the measured joint condition during inspection. An inspection in summer afternoons may show joints under higher compression, while winter inspections may show reduced compression.
Segmental bridges are rated using element-level condition states (CS) in the AASHTO Bridge Element Inspection Guide Manual and the National Bridge Inventory (NBI) condition ratings.
The AASHTO Bridge Element Inspection Guide Manual defines condition states for segmental bridge-specific elements:
| Element | CS-1 (Good) | CS-2 (Fair) | CS-3 (Poor) | CS-4 (Severe) |
|---|---|---|---|---|
| Segmental Joints | Minor discoloration, no cracking | Visible cracks < 0.3 mm, minor efflorescence | Cracks 0.3–1.0 mm, active efflorescence, rust staining | Joint separation > 1 mm, leaking, spalled concrete |
| Post-Tensioning Tendons | No visible corrosion, grout sound | Surface corrosion on wedges, minor staining | Section loss < 10%, broken wires in external tendons | Failed tendons, exposed strands, severe section loss |
| Box Girder Concrete | No delamination, spalling | Minor spalling (< 2% surface area) | Spalling 2–10% surface area, exposed reinforcement | Spalling > 10%, section loss, exposed tendons |
| Anchorages | Dry, no corrosion | Minor corrosion on bearing plate surface | Active corrosion, wedge corrosion, section loss | Failed anchorage, broken wedges |
The condition states are used to compute element condition indices for bridge management systems. A segmental bridge element rated CS-3 or CS-4 triggers repair or replacement action within a defined time frame.
The National Bridge Inventory (NBI) superstructure condition rating (Item 59) uses a 0–9 scale, with 9 being excellent condition. FHWA data indicates that segmental bridges built to ASBI standards typically achieve an average NBI superstructure rating of 7.1 at age 30 years — significantly higher than conventional reinforced concrete bridges of comparable age. This reflects the inherent durability of properly designed and constructed post-tensioned segmental bridges.
The AASHTO MBE provides system factors (φs) for load rating of segmental bridges (Table 6A.5.11.6-1). These factors account for the redundancy and failure mode of the structure based on bridge type (precast balanced cantilever, precast span-by-span, CIP), joint type (Type A or B), span type (interior, end, statically determinate), number of tendons per web, and number of hinges to failure.
| Bridge Type | Joint Type | Span Type | 2 Tendons/Web | 3 Tendons/Web |
|---|---|---|---|---|
| Precast Balanced Cantilever | Type A | Interior | 1.05 | 1.15 |
| Precast Balanced Cantilever | Type A | End | 1.00 | 1.10 |
| Precast Span-by-Span | Type A | Interior | 1.00 | 1.10 |
The system factor is multiplied by the nominal resistance in the load rating equation. Higher system factors reflect more redundant configurations (multiple tendons per web, multiple spans in a continuous unit).
Segmental bridge construction offers specific advantages that make it the preferred method for long viaducts and airport access bridges.
Economy through repetition: For bridges longer than 300–500 meters, the cost savings from industrialized construction become significant. The fixed costs of the casting yard, erection equipment, and team mobilization are spread over many segments, reducing the unit cost per m² of deck surface. Productivity increases through the learning curve effect — contractors typically achieve 80–90% of optimum cycle time after the first 10–20 spans.
Environmental benefits: Segmental construction eliminates the need for falsework that would disturb sensitive environments below the bridge. This is a major advantage for bridges over wetlands, waterways, protected habitats, deep gorges, and existing traffic. Construction can proceed without clearing vegetation, without building access roads for falsework, and without disrupting river or road traffic below.
Slender aesthetics: Segmental box girders allow longer spans with shallower superstructures compared to conventional beam bridges. The depth-to-span ratio for segmental bridges is typically 1:18 to 1:22 for constant-depth boxes (compared to 1:12 to 1:15 for conventional I-girder bridges) and 1:40 to 1:50 at midspan for varying-depth boxes. This produces a more elegant, open appearance.
Curved alignments: Segmental bridges adapt naturally to curved horizontal alignments, which is critical for highway interchanges and complex interchanges. Match-cast segments can be precisely adjusted to follow horizontal curves with radii as tight as 50–100 meters, which would be challenging or impossible with standard precast beams.
Low life-cycle cost: Post-tensioned segmental bridges require fewer maintenance interventions than jointed concrete bridges because there are no expansion joints (for continuous spans up to 600 m) and the prestressed concrete has controlled cracking. The elimination of deck joints prevents the most common cause of bridge deck deterioration — leaking joints that allow water and chlorides to attack the substructure below.
Construction over operational areas: Segmental construction using self-launching gantries allows bridges to be built over active taxiways, runways, service roads, and aprons without disrupting airport operations. The gantry spans from pier to pier without needing temporary supports on the ground below. Segments can be delivered along the completed deck or from the side, avoiding interference with aircraft movements.
Rapid construction: The fast erection cycle of segmental construction minimizes the duration of work within the air operations area (AOA), reducing the need for temporary closures, rerouting of aircraft, and security coordination. A typical span-by-span cycle of one week per span means a 500-meter viaduct can be completed in approximately 4 months.
Minimal maintenance: For airport authorities, the high cost of airside maintenance closures — which may require taxiway or runway closures coordinated with flight schedules — makes low-maintenance designs particularly valuable. Post-tensioned segmental bridges with continuous spans up to 300–400 meters between expansion joints minimize joint maintenance needs.
Durability in chemical environments: Airports use deicing chemicals (glycol-based fluids and potassium acetate) on pavements and bridges during winter operations. These chemicals can attack conventional concrete through chemical reactions with the cement paste. Segmental bridges with high-performance concrete (low w/c ratio, silica fume, fly ash) and effective joint sealing resist chemical attack better than conventional bridges.
Load capacity for heavy aircraft: Segmental bridges at airports must support aircraft loads per FAA AC 150/5320-6E, including load combinations for design aircraft such as the B-777-300ER (maximum ramp weight 352 tonnes) and the A-380 (maximum ramp weight 590 tonnes). The box girder cross-section provides high torsional rigidity for eccentric aircraft loads, and the post-tensioning system can be designed for the specific loading envelope of airport traffic.
The ICAO Aerodrome Design Manual (Doc 9157 Part 3) provides guidance on pavement design characteristics and the Pavement Classification Number (PCN) system for reporting the bearing strength of pavements and bridge decks. While ICAO focuses primarily on pavement design methodology, the same aircraft loading characterization applies to bridge structures within the airfield. Aircraft weight distribution allocates approximately 95% of the aircraft weight to the main landing gear and 5% to the nose gear. Wheel configurations are classified as Single (S), Dual (D), Dual Tandem (2D), Triple Tandem (3D), and Quadruple Tandem (4D). Segmental bridges at airports are designed using FAA/ICAO aircraft loads with AASHTO LRFD bridge design provisions.
Notable airport segmental bridge projects include the Felipe Ángeles International Airport (AIFA) in Mexico (2021), where VSL provided precast segmental bridge construction for access viaducts; the Seattle-Tacoma International Airport elevated roadways, where precast segmental construction minimized disruption to airport operations; and the Phoenix Sky Harbor International Airport bridge program, where segmental construction was evaluated for airfield bridges requiring long spans over taxiways.
Compiled from ASBI Segmental Construction Guidelines (2023), AASHTO LRFD Bridge Design Specifications (9th Edition), AASHTO Manual for Bridge Evaluation (3rd Edition), FHWA-HRT-13-028 Grout Sampling Guidelines, FHWA Corrosion-Induced Major Tendon Failures Report (2022), PTI/ASBI M50.3-12 Guide Specification, NCHRP Report on Load Rating of Segmental Bridges (2024), FAA AC 150/5320-6E, ICAO Doc 9157 Part 3, and PCI Bridge Design Manual.
TarmacView provides specialized non-destructive evaluation services for segmental concrete bridges — including joint condition assessment, tendon grout void detection, and corrosion surveys. Contact our team to schedule an inspection.
A prestressing tendon is a high-strength steel element — typically seven-wire strand, wire, or bar — used in prestressed or post-tensioned concrete to apply per...
Post-tensioning (PT) is a method of prestressing concrete where high-strength steel tendons are tensioned after concrete hardening, applying compressive stress ...
A box girder is a hollow, closed-section bridge girder of steel or concrete that provides high torsional stiffness and efficiency for curved or long-span bridge...